Pushing VisionFive 2 RISC-V board into 2025
 StarFive's VisionFive 2 RISC-V Board
Trip down the memory lane
Bit of a preface:
I bought this board somewhere in June 2024; I plugged it in to verify it worked and that was pretty much it; I remember interfacing it through UART and it came with a super custom Debian-based distro on an SD Card. It also came with a 128GB eMMC module (I had never seen removable eMMC module until that point!) which kinda increased the cool factor for me.
It felt super cool to start seeing "mainstream" adoption of RISC-V, this new and open-source ISA that had started powering electronics all around the globe; but how was the software stack?
It was okay...-ish
Let's start by saying that considering how costly it is to develop the ecosystem, we, the users, can't really expect upstream support from day one; heck, sometimes even after years in production, products still are closed source and are pretty much destined to die off slowly without the help of the Open Source community!
So yes, it was okay-ish but it served good; hardware accelerated graphics, external displays, a network stack... It was and still is, usable, but we can make it even better.
The hardware
The VisionFive 2, is powered by a JH7110 SoC, containing 1.5GHz quad-core 64-bit RISC-V Scalar Processor implementing RV64IMAFDCSUZicsr_Zifencei_Zba_Zbb features (It's basically RV64GC plus Zba and Zbb).
It has a few other goodies, such as an Imagination GPU and so on; but this are irrelevant for us right now.
It's by no means fast, but it doesn't pretend to be; it's sole prupose was/is being an early-adoption board so that the enthusiasts/companies can run their tests on to gauge how it may look like on actual hardware; so that by itself, is quite the feat already.
At some point in late '24 the (Supposed) successor to the 7110, the 8100, was mentioned on a Linux Kernel Mailing List; but it hasn't been officially announced/released as of May 2025.
Now that we understand the basics of our SoC...
How much has been already upstreamed?
I started looking at probably the easiest place to check for mainline support...
Linux!
Lo-and-behold, there's patches that have already been upstreamed to support the SoC and it's peripherals; as of May 2025 there's still some that haven't been merged yet (Most important one, being the HDMI controller logic, DRM... and whatnot) and I personally think they probably won't be merged because it's been a bit of a while since last activity on patchwork; but you can easily download the patches in .mbox format if needed and apply them manually into your tree.
I only had to search for a defconfig, thankfully the cool people over at StarFive already have a Linux tree with one (starfive_visionfive2_defconfig), clone the project and target that config; it all compiled fine and booted first try. All the major things I mainly need the board to have working (Ethernet, NVME, SD Slot and eMMC), worked first try.
It is worth noting I have not personally tried the GPU on it's own (Haven't connected the board to a monitor nor have tested the hardware acceleration, video encoding/decoding...) so if that's a feature you actually need, it's a bit of a mistery for me. I planned on using this as a headless homelab-esque machine to run some stuff on.
So there we had it, VF2 board running the latest and greatest Linux version! But... I figured I may as well not stop there...
VisionFive 2 Boot Process
RISC-V Machine-mode stage
NOTE: This may have inaccuracies since I don't work for StarFive, it's based on my personal interpretations and findings/reverse engineering regarding the board whilst doing all the work on it.
When the board powers on, the CPU executes a ZSBL (Zero-stage bootloader) presumably off of an EEPROM or something similar¹, it's read-only and you can't access it's contents because it's unmapped as soon as the rest of the boot chain starts executing; you could probably try sniffing the contents out of it if provided it's not in the die package of the SoC an is located somewhere in the board; but considering the things it does it's probably best just to ignore it since it's unique task is bootstrapping the processor to the next stage (So most probably, boring assembly to do all of this; nothing interesting).
¹: It's an on-chip diode rom mapped at physical address 0x2a000000
Then, it jumps to a cut-down u-boot that gets loaded off of flash storage. It's called u-boot SPL (Second Program Loader), it basically exists to provide a bit of a richer environment to run code on; it has a few interesting things bootloader-wise (It can load things off of an SPI NOR/NAND for instance) but not much else; it's task is to bootstrap into OpenSBI to finally enter RISC-V's S (Supervisor) mode and act as a handler for a few "supervisor" calls launched from lower privilege levels.
  graph LR
    ZSBL["ZSBL<br/>(Zero stage bootloader)"] --> SPL["u‑boot SPL<br/>(Second program loader)"]
    SPL --> OpenSBI["OpenSBI"]
    ZSBL -.-> M["Machine mode"]
    SPL -.-> M
    OpenSBI -.-> S["Supervisor mode"]

    %% -- node colour classes with contrasting text color
    classDef m_mode fill:#FF9A00,stroke:#333,stroke-width:1px,color:#000;
    classDef s_mode fill:#FF0000,stroke:#333,stroke-width:1px,color:#000;

    %% -- assign nodes to classes
    class M m_mode
    class S s_mode
RISC-V Supervisor-mode stage
Now we're on supervisor mode thanks to OpenSBI, what happens now is that it tries loading the actual u-boot (Not the cut-down SPL) from the flash and jumps to it.
This is where things start getting interesting because it's where the gates really open up to anything; but to keep it simple, we just need to know that u-boot is autoconfigured to load a "DTB" (Device Tree Binary, think of it of a much saner ACPI without the x86 ugliness) that contains the board's required information that Linux needs to parse in order to load itself and init the board's components; then Linux and finally jumping to it, but it can do so officially from 3 different places:
- eMMC storage
- Micro SD Card
- NVME drive
(The unofficial way would be to store it on the flash the board has, it's 16MiB after all, but that means you'll need to do some memory juggling because the SPL and the rest of u-boot/OpenSBI have predefined memory ranges on the flash and must not overlap for obvious reasons).
So once the boot media is decided, it does the exciting jmp (Or should I say j...?) to Linux.
Incidentally, Linux also technically runs in S-mode; so we're missing one last stage; current event horizon is as follows:
  graph LR
    UBOOT["u‑boot"] --> eMMC["eMMC"]
    UBOOT --> SDIO["SDIO<br/>(SD Card)"]
    UBOOT --> NVME["m.2 NVME"]

    eMMC --> Linux["Linux"]
    SDIO --> Linux
    NVME --> Linux
RISC-V User-mode stage
Right after Linux finishes bootstraping all the required things for it, proceeds to setup user-mode registers (CSRs) and delegates the control to the least-privilged mode sometime after loading the required system services. So in a way, Linux kinda lives in 2 separate privilege levels at the same time (Not that different from what you'd see on x86 technically).
  graph LR
  %% -- Machine mode group
  subgraph "Machine mode"
    direction TB
    ZSBL["ZSBL<br/>(Zero stage bootloader)"]
    SPL["u‑boot SPL<br/>(Second program loader)"]
  end

  %% -- Supervisor mode group
  subgraph "Supervisor mode"
    direction TB
    OpenSBI["OpenSBI"]
    UBOOT2["u‑boot"]
    eMMC["eMMC"]
    SDIO["SDIO<br/>(SD Card)"]
    NVME["m.2 NVME"]
    LinuxSup["Linux supervisor mode"]
  end

  %% -- User mode group
  subgraph "User mode"
    direction TB
    LinuxUser["Linux user mode"]
  end

  %% -- flow arrows
  ZSBL    --> SPL
  SPL     --> OpenSBI
  OpenSBI --> UBOOT2
  UBOOT2  --> eMMC
  UBOOT2  --> SDIO
  UBOOT2  --> NVME
  eMMC    --> LinuxSup
  SDIO    --> LinuxSup
  NVME    --> LinuxSup
  LinuxSup--> LinuxUser

  %% -- styling
  classDef machine    fill:#FF9A00,stroke:#333,stroke-width:1px,color:#000
  classDef supervisor fill:#FF0000,stroke:#333,stroke-width:1px,color:#fff
  classDef device     fill:#B3E6B3,stroke:#333,stroke-width:1px,color:#000
  classDef usermode   fill:#A3CEF1,stroke:#333,stroke-width:1px,color:#000

  %% -- assign nodes to classes
  class ZSBL machine
  class SPL machine
  class OpenSBI device
  class UBOOT2 device
  class LinuxSup device
  class eMMC device
  class SDIO device
  class NVME device
  class LinuxUser usermode
That's it, that's the full chain.
There's been some developments lately that I had been following closely; but that'll also come later.
Updating u-boot
In a similar fashion as Linux, u-boot also has the VisionFive 2's tidbits upstreamed; so you can pretty much download the source code, compile it and flash it (Both the SPL and u-boot itself) and you'll automatically have a much updated version; no big deal here...
...except if you want the VisionFive 2 to run UEFI.
Fixing u-boot SPL to boot EDK2
StarFive employees pointed in the forums that a preview of EDK2 could be installed on our boards. It works well, but there's 2 minor catches for me:
- You must run their old u-boot fork with the SPL patches to get it to load EDK2
- You must run their old edk2 fork with VF2 patches
It's worth noting that even after 3 days of work I haven't had the time to upgrade the EDK2 version, but this'll do for the meantime (I'm actually working on that as of writing this blog, if I succeed I promise a future entry here!).
So I got my hands to work...
...though I couldn't progress much; apparently for some reason I've not had the time to investigate further (Other than finding the root issue) but the SPL can't figure out the FDT location inside the SPL binary and crashes on NULL address...
I made what is probably one of my worst hacks ever, I calculate the address in advance and just offset the base address accordingly; this is stupid (It means you have to hexdump the resulting binary searching where the the FDT header is to fix the offset everytime code size changes or different compilers... etc). But hey, it works; once I have the time to investigate this it'll probably end up somewhere in the u-boot code.
With this, we have StarFive's EDK2 running again, but I wasn't still satisfied; I wanted to be the one provisioning the board with my own binaries (Not that I don't trust StarFive or things you may be thinking, it's just personal preference purely for the funzies).
Crying over EDK2 and fixing it
EDK2 sucks. Literally.
I cannot withstand how it's organized, but even less, how it's compiled.
It's reminiscent of my old days (2014~, I was barely 13 years old) when I started doing Linux kernel hacking to get a more recent version running on an old phone I had that used a MediaTek SoC.
They had a custom build system built around the kernel that was outdated by the time I tried to compile it (I even had to download 5~ year old Ubuntu versions at that time, 9.04, to satisfy the scripts...).
(It's great actually, impressive project; but I wanted to vent).
So yeah, expect environment variable shenanigans and lots of trial and error; I've built EDK2 about 100~ times in the weekend I'm writing this entry and yet sometimes I still can't figure out what I'm missing to get it to compile.
Long story short; to make EDK2 work with my upstreamed u-boot SPL, I've had to update all the device tree information and misc. regarding the board else it wouldn't do anything. You can see the required changes here.
At some point EDK2 started booting again so I got all excited...
...but then it failed again (It always does).
This remains to be fixed, but since I personally don't use SDIO/eMMC anymore to boot the board (I just use an NVME I had laying around) I just went in and disabled the MmcDxe from running.
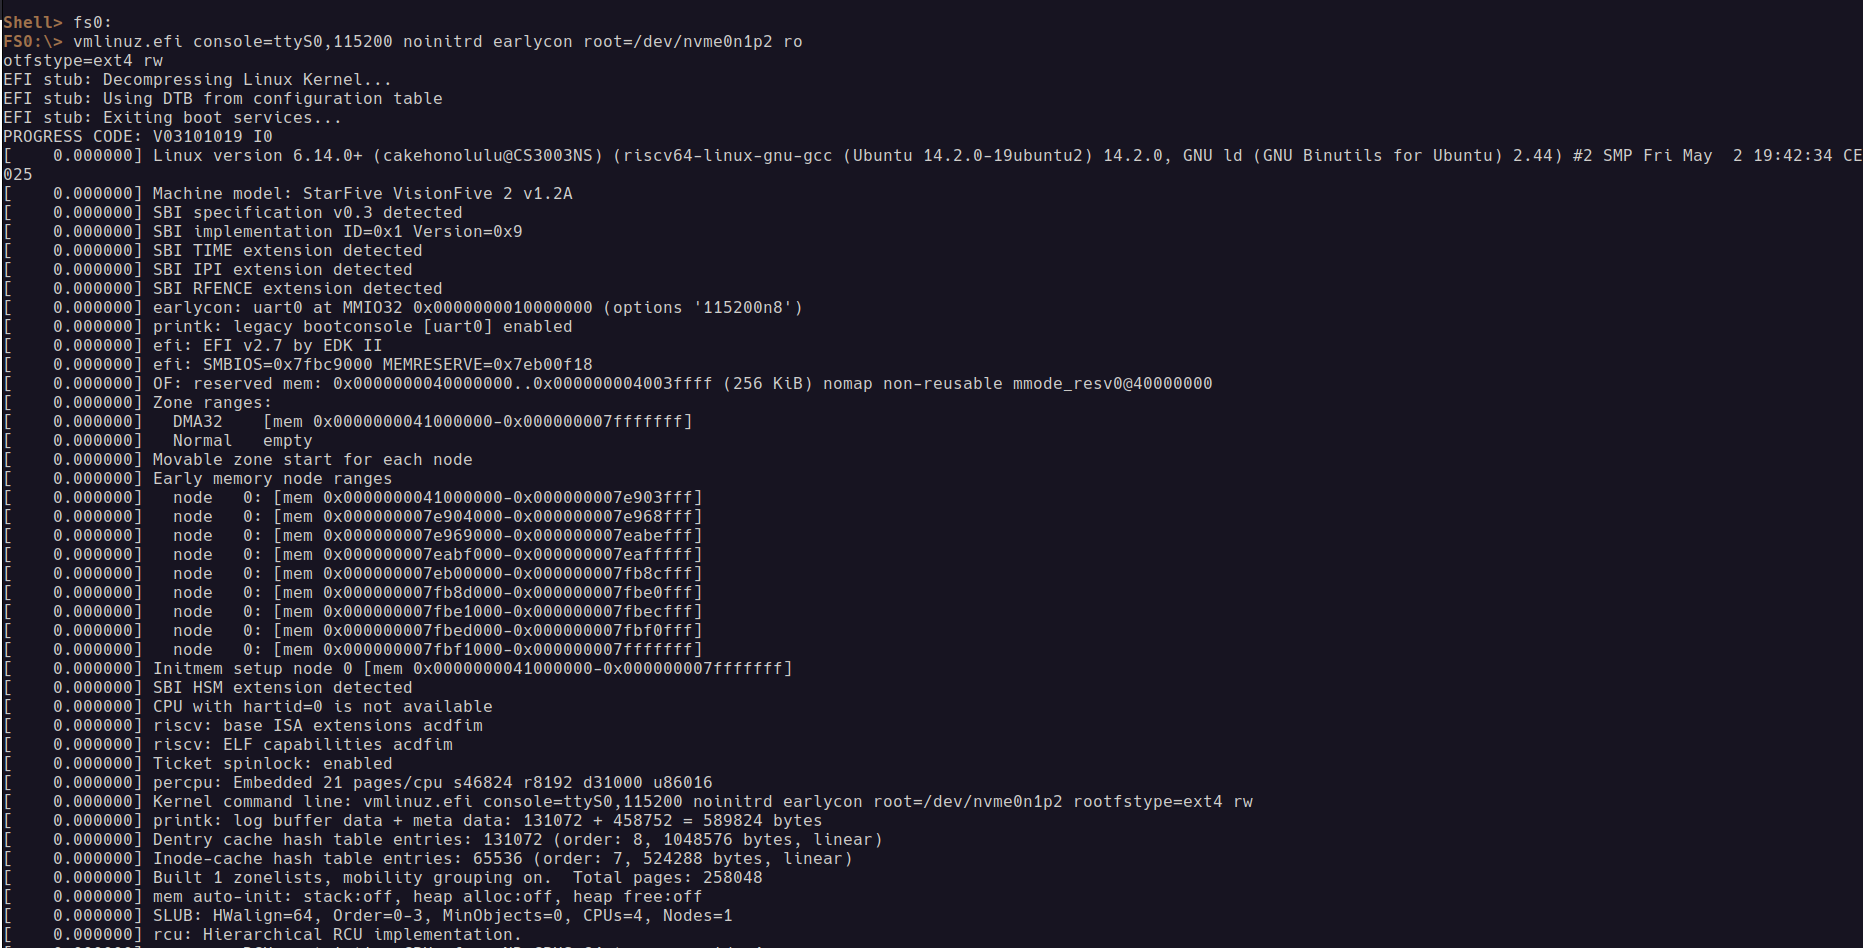 EDK2 running on updated VisionFive 2 board
It's worth noting that I had some issues regarding Linux booting, I had to customize the EFI/BOOT/startup.nsh file a good bit to make it log correctly and so on (Also, to no try and find a initrd in memory failing miserably because I don't have one...).
Debian sid
Debian Trixie appears to be supporting the riscv64 arch so I figured, why not building an image out of it? debootstrap it was!
I built an ext4 image that I simply wrote over a partition on the NVME and Linux took care of it by specifying the root= and rootwait cmdline parameters on startup.nsh.
But the end result was, very, very worth it, here's how to do it:
Building a EFI-capable Debian Trixie 13 sid image and adding GRUB
We'll start by creating a disk image, making the partitions and formatting them:
$ dd if=/dev/zero of=debian-visionfive.img bs=1M count=1500

$ fdisk debian-visionfive.img

g (For gpt)

n, default (enter), default (enter), +256MB, t, 1 # To change type from Linux filesystem to EFI System

n, default (enter), default (enter), default (enter) # For the ext4 rootfs

w # To flush the changes

$ sudo losetup --partscan /dev/loopXX debian-visionfive.img

$ sudo mkfs.fat /dev/loopXXp1
mkfs.fat 4.2 (2021-01-31)

$ sudo mkfs.ext4 /dev/loopXXp2
mke2fs 1.47.2 (1-Jan-2025)
Discarding device blocks: done
Creating filesystem with 321024 4k blocks and 80320 inodes
Filesystem UUID: 4146fe1f-6c1d-4668-b6c6-751ff316d35a
Superblock backups stored on blocks:
	32768, 98304, 163840, 229376, 294912

Allocating group tables: done
Writing inode tables: done
Creating journal (8192 blocks): done
Writing superblocks and filesystem accounting information: done
Now, with the disk properly formatted and using GPT scheme, we can proceed to install Debian and chroot to it.
First, we'll mount everything needed:
$ mkdir -p debian/boot/efi

$ sudo mount /dev/loopXXp1 debian/boot/efi/

$ sudo mount /dev/loopXXp2 debian/

$ sudo mount --bind /dev debian/dev

$ sudo mount -t devpts /dev/pts debian/dev/pts

$ sudo mount -t proc proc debian/proc

$ sudo mount -t sysfs sysfs debian/sys

$ sudo mount -t tmpfs tmpfs debian/tmp
Now, we'll install Debian on it...
$ sudo debootstrap --arch=riscv64 sid debian/...and we'll chroot into it:
$ sudo chroot debianIt's worth noting that, we'll have to compile Linux and get debian packages out of it; you can do so with:
$ make ARCH=riscv CROSS_COMPILE=riscv64-linux-gnu- bindeb-pkg KBUILD_IMAGE='arch/riscv/boot/Image' -j$(nproc)And then just copy the linux-headers*.deb and linux-image*.deb files inside the chroot.
We'll now install those packages:
root@RYZEN5:/# dpkg -i tmp/linux-headers-6.14.0-dirty_6.14.0-10_riscv64.deb tmp/linux-image-6.14.0-dirty_6.14.0-10_riscv64.deb
Selecting previously unselected package linux-headers-6.14.0-dirty.
(Reading database ... 8347 files and directories currently installed.)
Preparing to unpack .../linux-headers-6.14.0-dirty_6.14.0-10_riscv64.deb ...
Unpacking linux-headers-6.14.0-dirty (6.14.0-10) ...
Selecting previously unselected package linux-image-6.14.0-dirty.
Preparing to unpack .../linux-image-6.14.0-dirty_6.14.0-10_riscv64.deb ...
Unpacking linux-image-6.14.0-dirty (6.14.0-10) ...
Setting up linux-headers-6.14.0-dirty (6.14.0-10) ...
Setting up linux-image-6.14.0-dirty (6.14.0-10) ...
root@RYZEN5:/#
Now, we'll install some packages that will come in handy:
root@RYZEN5:/# apt install initramfs-tools systemd-timesyncd rsync bash-completion u-boot-menu wget binutils sudo network-manager net-tools fastfetch util-linux haveged openssh-server systemd kmod conntrack ebtables ethtool iproute2 iptables mount socat ifupdown iputils-ping pciutilsLet's also prepare the network interfaces:
cat << EOF >> /etc/network/interfaces
auto lo
iface lo inet loopback
#setup network for starfive end0
allow-hotplug end0
#iface end0 inet dhcp
#setup network for starfive end1
allow-hotplug end1
#iface end1 inet dhcp
EOF
We're also going to need to add our hostname info, nano the /etc/hosts and under the 127.0.0.1 localhost just add:
127.0.1.1 visionfive2Or whichever hostname you want, really.
Also add it to /etc/hostname.
User management's turn now, set the root password:
root@RYZEN5:/# echo "root:root" | chpasswdAnd create your regular user:
root@RYZEN5:/# useradd cakehonolulu -s /bin/bash -m
root@RYZEN5:/# echo "cakehonolulu:super_secure_password" | chpasswd
root@RYZEN5:/# usermod -aG sudo cakehonolulu
That's it! We're now missing the proper EFI enablement, GRUB will come to the rescue:
root@RYZEN5:/# apt install grub-efi

root@RYZEN5:/# grub-install --target=riscv64-efi --efi-directory=/boot/efi --bootloader-id=debian --recheck --no-nvram --removable
As a personal preference, I edit /etc/default/grub and modify GRUB_CMD_LINUX_DEFAULT from "quiet" to "" to see the boot log.
We also need to generate the /boot/grub/grub.cfg file, it's as easy as doing:
root@RYZEN5:/# grub-mkconfig -o /boot/grub/grub.cfgThough this is partly incorrect, just open the resulting file and rename all references to the loopXX medium to nvme0n1. Also change the mount mode from ro to rw if you want a R/W root filesystem (You very much need to).
We're set! Exit the chroot, unmount what we mounted at the start and copy the image over to your NVME drive:
$ sudo dd \
          if=debian-visionfive.img \
          of=/dev/your_drive \
          bs=16M status=progress
It's now a good time to resize the root partition to accomodate the entire drive:
$ sudo parted /dev/your_drive

GNU Parted 3.6
Using /dev/your_drive
Welcome to GNU Parted! Type 'help' to view a list of commands.
(parted) print
Warning: Not all of the space available to /dev/your_drive appears to be used, you can
fix the GPT to use all of the space (an extra 246997680 blocks) or continue with
the current setting?
Fix/Ignore? fix
Model: Realtek RTL9210B-CG (scsi)
Disk /dev/your_drive: 128GB
Sector size (logical/physical): 512B/16384B
Partition Table: gpt
Disk Flags:

Number  Start   End     Size    File system  Name  Flags
 1      1049kB  257MB   256MB   fat16              boot, esp
 2      257MB   1572MB  1315MB  ext4

(parted) resizepart 2 100%
(parted) quit
Information: You may need to update /etc/fstab.

$ sudo e2fsck -f /dev/your_drive2
e2fsck 1.47.2 (1-Jan-2025)
Pass 1: Checking inodes, blocks, and sizes
Pass 2: Checking directory structure
Pass 3: Checking directory connectivity
Pass 4: Checking reference counts
Pass 5: Checking group summary information
/dev/your_drive2: 29531/80320 files (0.2% non-contiguous), 209820/321024 blocks

$ sudo resize2fs /dev/your_drive2
With this, you can unplug the drive and re-install it back to the VF2. Assuming that you already installed my u-boot and edk2, it'll launch GRUB automatically.
May 9 2025 2:11AM in the morning EDK2 and u-boot update
EDK2-wise
I've been able to use more recent EDK2 version (Basically, up-to-date).
This is the EDK2 base repository with all the changes from upstream until today May 9 2025, and this other one is the one for the EDK2 Platforms.
I've made a few changes to the JH7110.dsc target description file to accomodate for new EDK2 changes, but all appears to be working just fine (Like the propietary, outdated fork, from StarFive).
Here's a new screenshot (It's now being built as RELEASE instead of DEBUG!):
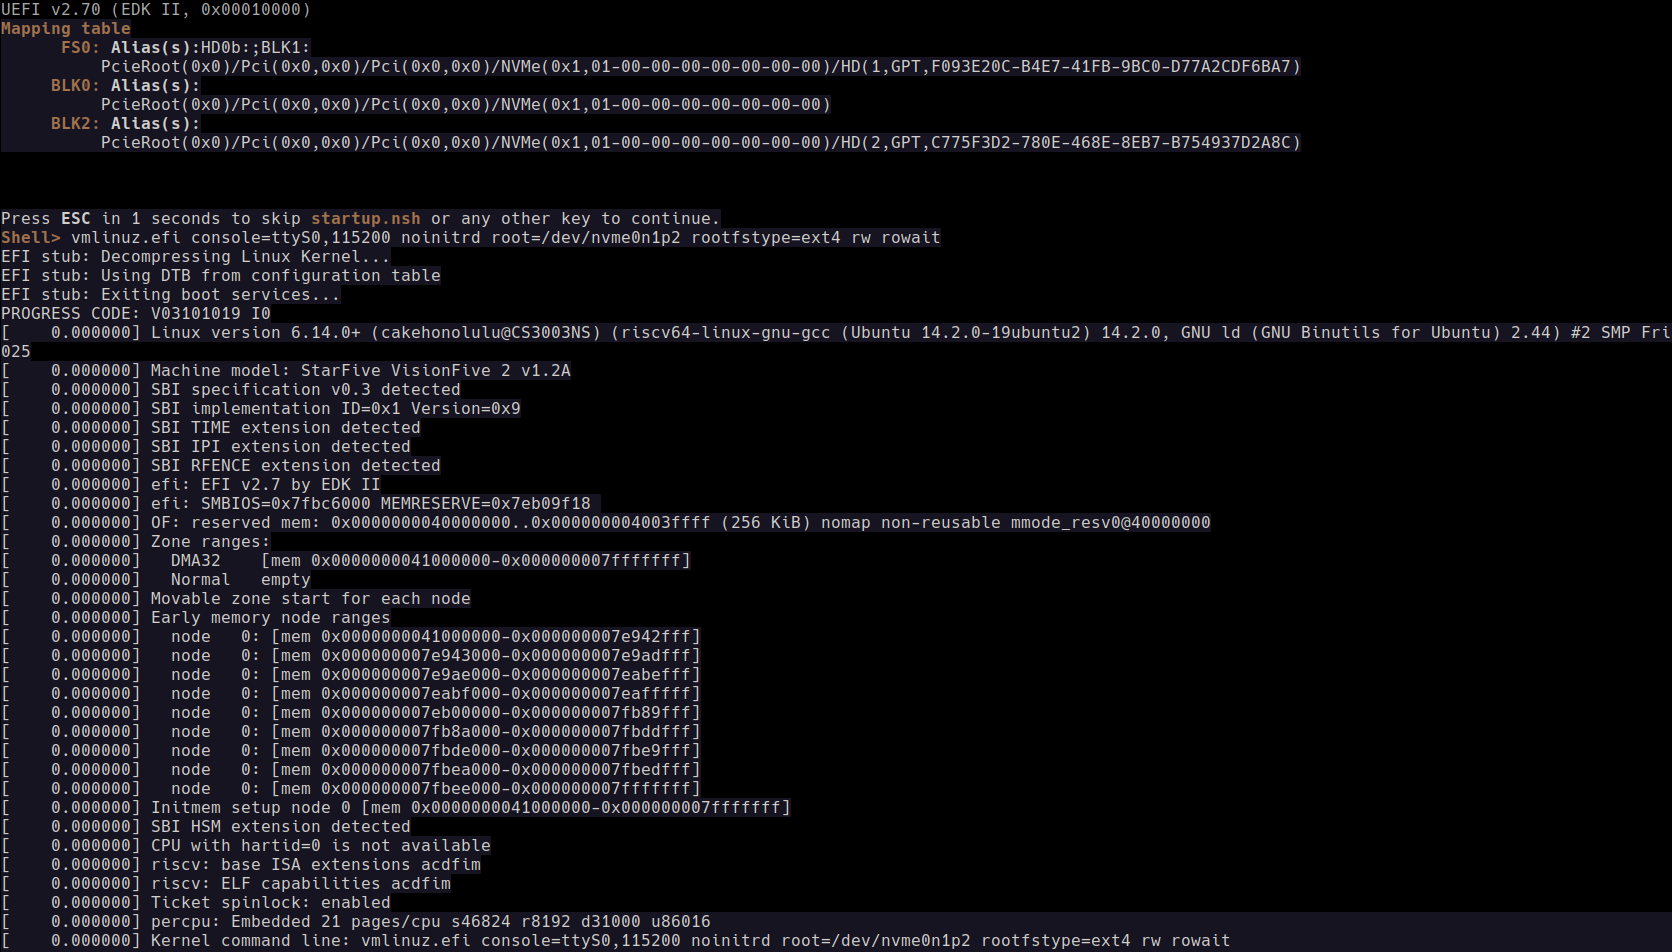 Upstream EDK2 running on updated VisionFive 2 board
U-boot wise
So, I've also been battling with the hack I had to resort to to make U-boot launch EDK2 from flash in SPL mode for the VF2, but even though the config file is as recommended by u-boot themselves, which is either CONFIG_OF_EMBED or CONFIG_OF_SEPARATE (StarFive's downstream fork uses the prior) set to y in starfive_visionfive2_defconfig it still refuses to find the FDT on the SPL image in-memory somehow; not too sure if this is a config mishap or maybe some strange u-boot bug...
For now, my cute little hack will do.
May 10 2025 3:41AM in the morning EDK2 update
I've finally got EDK2 firmware menu and boot selector to work for the VF2! Woohoo!
Bonus, we can now have GRUB to the loading for us and Debian is now fully EFI-aware!
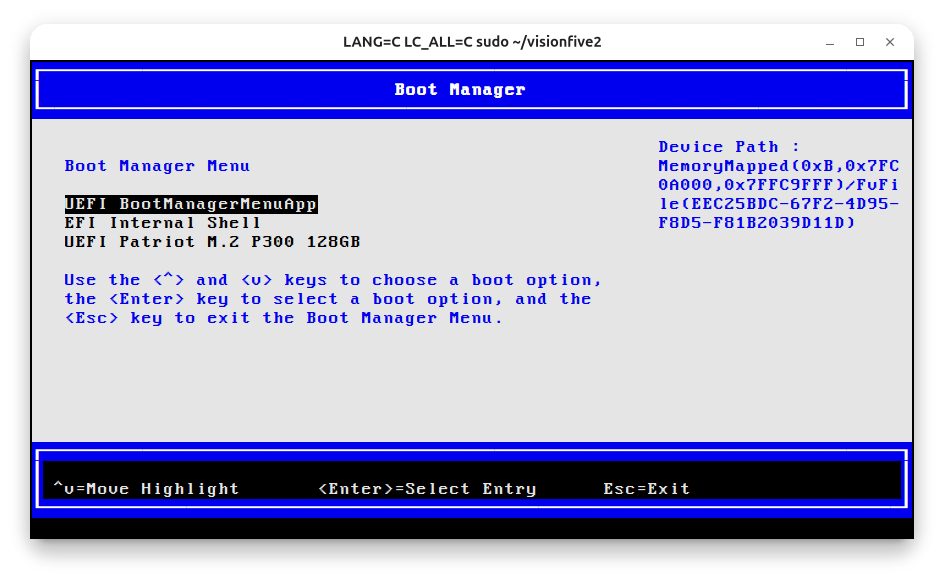
Showcase of the EDK2 firmware menu, boot selection and GRUB booting Debian SID
An EDK2 firmware menu static:
All in all, a frustrating-yet-insanely cool experience.